BINF 6215: Building a variant detection workflow in CLC
In this exercise, we’re going to work with the UNCC chloroplast genome data set again — the one you generated in the Genomics lab if you took that course. You did this workflow by hand in BINF 6203, but now we’re going to turn it into a reproducible, automatic process.
Step 1. Get your data loaded into the system
In BINF 6203, you probably loaded only one or a few of the chloroplast genome sequence read files. This time, you’re going to load all of them, because your workflow will make it easy to analyze each of the data sets the exact same way. You’ll also need to load in your reference genome if you don’t have it already.
I have my data organized like so:
While your data is loading, we’ll plan out the workflow.
Class discussion:
1. What are the steps that you need to include in this process, assuming you are starting with the unmodified data straight from the sequencer?
2. Are there additional possible steps in the variant-calling module in CLC that you think would be interesting to add to the workflow?
Step 2. Choose your tools (File / New / Workflow)
First, you need to create a workflow space to work in. While in CLC, from the top Apple menu bar, choose File/New/Workflow, and then Save As to give your new empty workflow a name (like CPVariant-Workflow). Now you can start adding elements. Click the “Add Element” button at the bottom left corner.
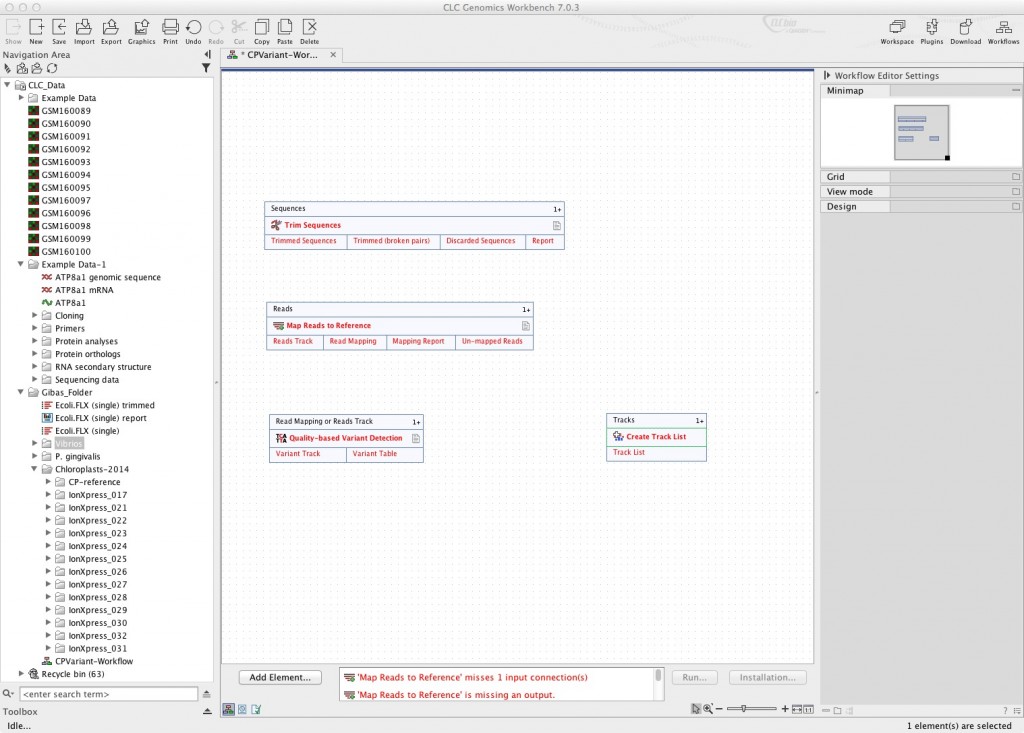
In the above image, you can see that I’ve added four elements to my initial workflow. They’re ones you should recognize: read trimming, mapping to reference, quality-based detection of variants, and building a track list. This is the bare minimum of what you can do with this data.
Step 3. Connect your tools
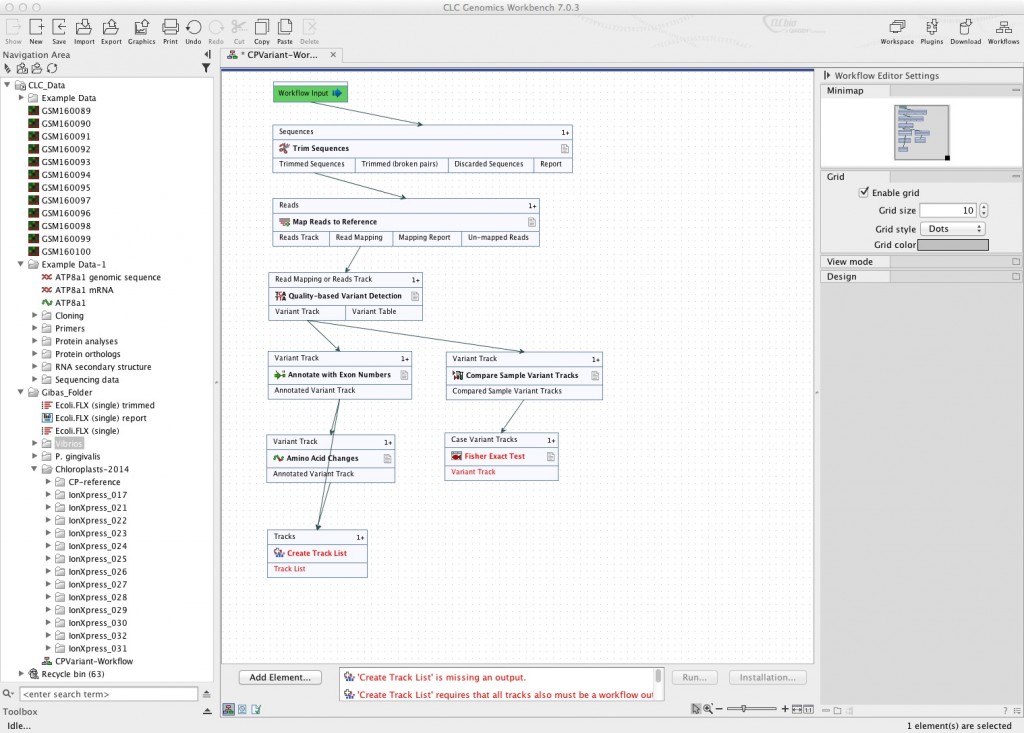
The workflow steps you chose can now be connected. If you look at the element boxes in the picture above, they have three rows. The middle row is the tool name. The top row is the type of input it needs. The bottom row is the types of output it produces. When you mouse over the various boxes, you will get a small menu that will show you what that input or output can be connected to. Connect sequence trimming to your “workflow input”. Then connect the correct output element to the input of each of the subsequent steps.
Question: Are the sequence reads the ONLY input that you need for this workflow? Is there another input? What is it? Since you can only have one input to this workflow, what will you need to do prior to running it, to prepare that other data?
Step 4. Configure your tools
Each step in your workflow is going to require configuration — all those parameters and settings that you set when you set up a run manually, still need to be chosen. The purpose of a workflow is that it will remember your settings and run the same analysis every time on all of the data sets you input.
To configure a step in the workflow, click on the middle box (containing the name of the tool) and hold, then choose “Configure”. You’ll get access to all the configurable options for that step. Some things (like reference genomes) are configurable, but you may not wish to enter a value for them. Choosing the chloroplast genome as the permanent reference genome for this workflow is possible, but the workflow won’t be reusable unless you reconfigure.
Step 5. Choose your outputs
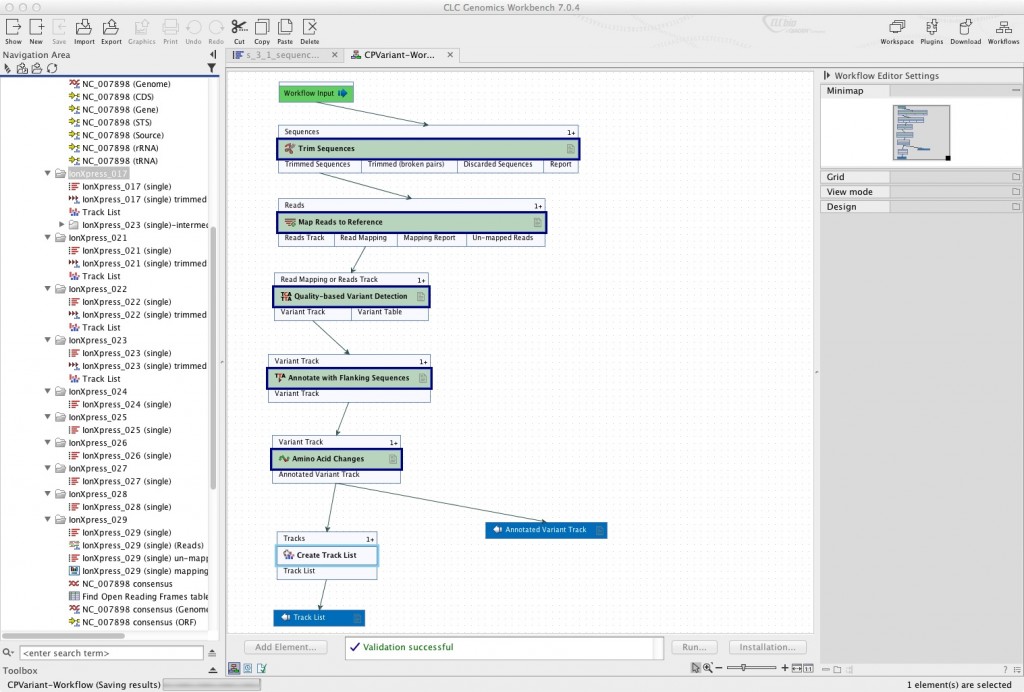
You can save everything or nothing as output of your workflow. In the example below, in addition to setting the annotated variant track as output, I’ve connected the variant track to “Save as Track List” so a track list is generated for each genome.
Step 6. Test your workflow
At the bottom of the main window, when your workflow is open, you should see a “Run” button. This is the test. Run your workflow and choose one of the chloroplast data sets as a test (you shouldn’t do all of them until you see that it works). It should produce a variant annotation track and a track list for the data set you chose. Once you know that your workflow produces the correct outputs, you can run it on all your data, and even go on to install it as described in the CLC workflow builder tutorial.


